Chain tension adjustment is a crucial aspect of chopper motorcycle maintenance that often goes overlooked by riders. Ensuring the proper tension in the chain not only enhances performance but also extends its lifespan, reducing the risk of premature wear and potential accidents. For instance, consider a hypothetical scenario where a rider neglects to regularly adjust their chain tension. Over time, this negligence could lead to excessive slack in the chain, causing it to jump off the sprockets while riding at high speeds, resulting in loss of control over the motorcycle.
In order to understand the importance of chain tension adjustment, it is essential to grasp how it directly affects both performance and safety. When a motorcycle’s chain becomes too loose or too tight, various issues can arise. Excessive looseness may cause slippage on acceleration or sudden deceleration due to inadequate power transfer from engine to rear wheel. On the other hand, overtightening may strain the components involved, leading to accelerated wear and tear as well as increased resistance when rotating. These problems compromise not only the overall efficiency of the bike but also jeopardize rider safety during critical maneuvers such as cornering or braking.
Importance of chain tension
Importance of Chain Tension
To understand the importance of maintaining proper chain tension on a chopper motorcycle, consider the following example: Imagine yourself riding down an open highway with the wind in your face and the roar of the engine beneath you. Suddenly, without warning, your motorcycle’s chain snaps, causing a catastrophic failure that brings your exhilarating ride to an abrupt halt. This scenario illustrates just how crucial it is to ensure the correct tension in your bike’s chain.
Properly adjusted chain tension not only affects the performance of your motorcycle but also has significant implications for safety. When the chain tension is too loose, it can lead to slippage or even disengagement from either the front or rear sprockets. On the other hand, excessive tightness can cause unnecessary strain on various components of the drivetrain system, leading to accelerated wear and potential damage.
Maintaining optimal chain tension is vital for several reasons:
- Enhanced Performance: A well-adjusted chain allows power transmission from the engine to the rear wheel more efficiently, resulting in smoother acceleration and improved overall performance.
- Extended Component Lifespan: Properly tensioned chains reduce stress on both themselves and adjacent parts such as sprockets and bearings, thus extending their lifespan.
- Reduced Maintenance Costs: By regularly checking and adjusting chain tension, riders can prevent premature wear or damage to expensive drivetrain components.
- Improved Safety: Maintaining appropriate chain tension minimizes unexpected failures while riding by reducing risks associated with sudden loss of power or unwanted slipping.
| Reasons for Maintaining Optimal Chain Tension |
|---|
| Enhanced Performance |
In conclusion, ensuring proper chain tension plays a critical role in enhancing performance, prolonging component lifespans, minimizing maintenance costs, and improving rider safety. In our next section, we will delve into the signs that indicate improper chain tension, allowing you to identify potential issues before they become major problems.
Identifying signs of improper chain tension
Chain tension is a critical aspect of maintaining a chopper motorcycle. In the previous section, we discussed the importance of chain tension and its impact on overall performance. Now, let’s delve into identifying signs of improper chain tension to ensure optimal functionality.
To illustrate this point, consider a hypothetical scenario where a rider notices unusual vibrations while riding their chopper motorcycle. These vibrations can be attributed to incorrect chain tension. It is essential for riders to recognize such signs promptly to prevent further damage and maintain safe riding conditions.
Identifying signs of improper chain tension:
- Excessive noise: One noticeable sign of improper chain tension is excessive noise coming from the drivetrain. A loose or tight chain can cause an annoying rattling sound, indicating that adjustments are necessary.
- Uneven wear patterns: Inspect your sprockets regularly for uneven wear patterns as they may indicate issues with chain alignment or adjustment. Properly aligned chains should have uniform contact with the sprocket teeth.
- Difficulty shifting gears: If you experience difficulty in smoothly shifting gears or notice abrupt gear changes, it could be due to incorrect chain tension. An overly tight or loose chain affects the smooth operation of the transmission system.
- Chain slack: Another common indicator of poor chain tension is excessive slack or drooping between the front and rear sprockets. This excess slack can lead to reduced power transfer efficiency and increased risk of derailment.
It is crucial for every chopper motorcycle owner to pay attention to these signs and take appropriate action when required. Regular maintenance and timely adjustments will not only optimize performance but also enhance safety during rides.
In our next section about “Tools required for chain tension adjustment,” we will discuss the specific tools needed to undertake proper chain tension adjustments effectively without damaging any components.
Tools required for chain tension adjustment
Chain tension is a critical aspect of maintaining a chopper motorcycle. Improper chain tension can lead to various issues such as excessive wear, poor performance, and even safety hazards. In this section, we will discuss the tools required for chain tension adjustment.
Before diving into the tools needed for this task, let’s consider an example to understand the importance of proper chain tension. Imagine you are riding your chopper on a long journey when suddenly you notice a strange noise coming from the rear wheel area. As you inspect further, you realize that the chain tension is too loose, causing it to slap against other components. This not only affects your riding experience but also puts unnecessary stress on the chain and sprockets, ultimately reducing their lifespan.
To ensure smooth functioning and longevity of your motorcycle’s drivetrain system, it is essential to have the appropriate tools at hand for adjusting chain tension. Here are some commonly used tools:
- Chain Adjustment Tool: A specialized tool designed specifically for making precise adjustments to the chain tension.
- Socket Wrench Set: Different socket sizes may be required depending on your motorcycle model.
- Torque Wrench: Used to accurately measure and apply torque while tightening bolts or nuts.
- Measuring Tape or Ruler: Helps in measuring the distance between certain points on the motorcycle frame or swingarm.
Now that we have discussed the necessary tools for chain tension adjustment let us move forward with our step-by-step guide to help you achieve optimal results in maintaining perfect chain tension without compromising safety and performance. But before we delve into that, it is important to understand how improper chain tension manifests itself through various signs which we covered in detail earlier.
Next Section: Step-by-step guide to adjust chain tension
Step-by-step guide to adjust chain tension
Transitioning from the previous section, where we discussed the tools required for chain tension adjustment, let us now delve into a step-by-step guide on how to adjust the chain tension of your chopper motorcycle. To illustrate this process, let’s consider a hypothetical scenario involving a rider named Alex and their chopper bike that has been experiencing excessive chain slack.
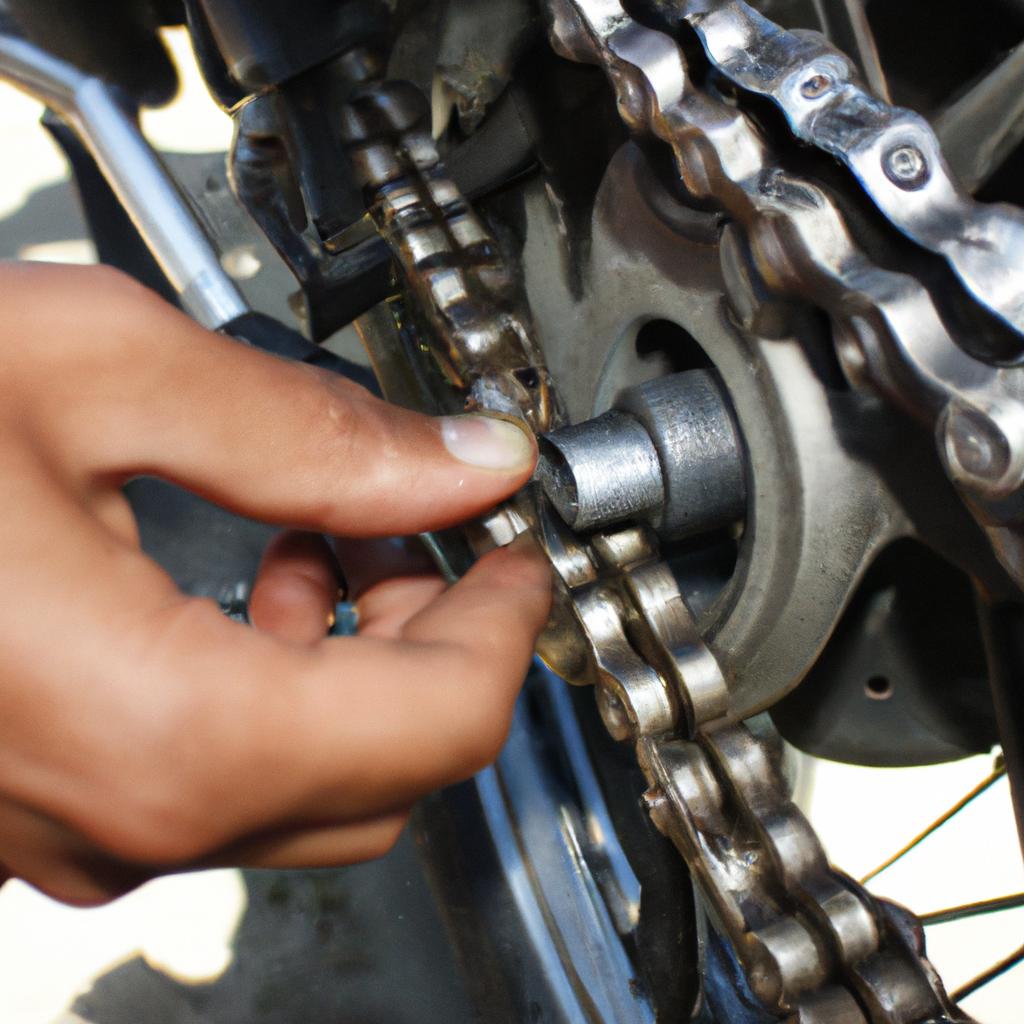
Step 1: Locate the Adjusters
The first step in adjusting the chain tension is to locate the adjusters. These are typically found at either end of the swingarm, near the rear axle. In our case, Alex finds them easily and prepares to make adjustments using appropriate tools like a wrench or socket.
Step 2: Measure Chain Slack
Next, it is crucial to measure the amount of slack in the chain before making any changes. This can be done by applying pressure on the bottom side of the chain midway between both sprockets with your fingers or using a specialized tool called a chain gauge. For optimal performance, refer to your motorcycle manufacturer’s specifications regarding recommended slack measurements.
Step 3: Adjust Chain Tension
Based on Alex’s measurement, they find that their chopper’s chain requires tightening as it exceeds the recommended slack range. They begin adjusting one side at a time by turning each adjuster bolt clockwise (right-side) or counterclockwise (left-side). It is essential to ensure equal turns on both sides for balanced tension distribution.
Now that we have covered these steps, let us explore some common mistakes that riders often make during chain tension adjustment in order to prevent potential issues down the road. By avoiding these errors, you can maintain optimal performance and prolong your chopper motorcycle’s lifespan.
- Over-tightening or insufficiently loosening the chain can lead to premature wear.
- Neglecting regular maintenance may result in poor performance and safety hazards.
- Ignoring the manufacturer’s recommendations can lead to further complications.
- Improper adjustment may cause excessive noise, vibration, or even chain failure.
Emotional Table:
| Mistakes to Avoid | Consequences |
|---|---|
| Over-tightening | Premature wear |
| Insufficient loosening | Poor performance |
| Neglecting maintenance | Safety hazards |
| Ignoring recommendations | Complications |
As we have now discussed how to adjust the chain tension on your chopper motorcycle and highlighted potential mistakes riders should avoid, let us move forward with exploring common issues encountered during this process in our next section.
Common mistakes to avoid during chain tension adjustment
Transitioning from the previous section, let’s further explore some common mistakes to avoid during chain tension adjustment. By being aware of these errors, you can ensure a smoother maintenance process for your chopper motorcycle.
Imagine this scenario: You’ve just finished adjusting the chain tension on your bike and are about to take it out for a ride. However, as soon as you start moving, you notice an annoying rattling sound coming from the chain area. This is a clear indication that something went wrong during the adjustment process. Let’s delve into some key mistakes that could lead to such issues:
- Over-tightening the Chain: One prevalent mistake is over-tightening the chain beyond its recommended specifications. Doing so puts excessive strain on not only the chain but also other components like sprockets and bearings. This can lead to premature wear and tear and may even cause catastrophic failure while riding.
- Neglecting Proper Alignment: Another crucial aspect often overlooked is ensuring proper alignment between the front and rear sprockets. Misalignment can result in uneven wear on both sprockets and the chain itself, reducing their lifespan significantly.
- Ignoring Lubrication: Adequate lubrication plays a vital role in maintaining optimal performance and longevity of your motorcycle’s chain system. Failing to regularly lubricate the chain leads to increased friction, accelerated wear, and potential rust formation.
- Not Checking for Excessive Wear: Lastly, neglecting regular inspections of your chain for signs of excessive wear can have detrimental effects on both safety and overall performance. A worn-out or damaged chain poses a significant risk when riding at high speeds.
To illustrate these points visually, consider the following bullet point list highlighting the consequences of each mistake:
- Over-Tightening: Increased strain on components; premature wear
- Misalignment: Uneven wear on sprockets; reduced lifespan
- Lack of Lubrication: Friction, wear, and potential rust formation
- Neglecting Wear Check: Safety risk; compromised performance
Additionally, the following table provides a concise overview of the mistakes to avoid during chain tension adjustment:
| Mistake | Consequence |
|---|---|
| Over-Tightening | Increased strain on components; premature wear |
| Misalignment | Uneven wear on sprockets; reduced lifespan |
| Lack of Lubrication | Friction, wear, and potential rust formation |
| Neglecting Wear Check | Safety risk; compromised performance |
By keeping these errors in mind and avoiding them during the chain tension adjustment process, you can ensure a smoother ride with improved reliability. In our next section, we will discuss regular maintenance techniques that help prolong the life of your motorcycle’s chain system while enhancing overall performance.
Regular maintenance to prolong chain life
Having discussed the common mistakes to avoid during chain tension adjustment, it is now essential to understand the importance of regular maintenance in prolonging the life of your motorcycle’s chain. By following a few simple steps and incorporating these practices into your routine, you can ensure optimal performance and longevity for your chopper.
Regular Maintenance: Prolonging Chain Life
To illustrate the significance of regular maintenance, let us consider a hypothetical scenario. Imagine two riders who own identical choppers with chains that have been adjusted correctly. However, Rider A neglects their chain maintenance while Rider B diligently follows a regular maintenance schedule. After several months, Rider A starts experiencing issues such as increased friction, reduced power transfer, and accelerated wear on the sprockets. In contrast, Rider B continues to enjoy smooth rides without any significant problems.
To achieve similar results as Rider B and extend the lifespan of your motorcycle chain, here are some key practices to incorporate into your routine:
- Lubrication: Regularly lubricating your chain helps minimize friction and prevents premature wear. Use a high-quality chain lubricant specifically designed for motorcycles and apply it evenly along the entire length of the chain.
- Cleaning: Removing dirt, debris, and old lubricant from your chain is crucial for its proper functioning. Utilize a suitable cleaning brush or specific tools available in the market to thoroughly clean both sides of the chain.
- Tension Adjustment: Maintaining an appropriate tension level is vital for optimum performance and safety. Refer to your motorcycle’s manual or consult a professional technician to determine the correct tension measurement for your model.
- Inspection: Routinely inspecting your chain allows you to identify signs of damage or excessive wear before they become more severe issues. Look out for loose links, tight spots, rust formation, or noticeable stretching.
By adhering to these best practices and integrating them into your regular maintenance routine, you can significantly prolong the lifespan of your motorcycle chain and enjoy a smoother, safer riding experience.
| Maintenance Practice | Benefits |
|---|---|
| Regular lubrication | Minimizes friction leading to reduced wear |
| Thorough cleaning | Removes debris and old lubricant for improved performance |
| Proper tension adjustment | Ensures optimal power transfer and reduces chain fatigue |
| Routine inspection | Identifies potential issues before they worsen |
Incorporating these practices into your maintenance routine not only enhances the longevity of your chopper’s chain but also contributes to overall safety. By investing time in regular maintenance, you can avoid costly repairs or replacements down the road while optimizing your motorcycle’s performance. Remember that prevention is always better than cure when it comes to maintaining your precious ride.
Comments are closed.